What a wonderful, yet relaxing celebration it was. Christmas Eve day was our busiest day. We visited my beautiful in laws at noon that day, and we had such a wonderful time. It was a bit hectic, but a blissful hectic with 8 little cousins running around ranging from ages 2 to 11. We enjoyed a turkey feast and then the opening of gifts shortly after. Dessert followed after that for those who still had room in their bellies for more. Grandma Karen (my mother in law) found them the most unique gifts. All of the older children were given marionettes that bared an uncanny resemblance to each cousin.

Everyone absolutely adored these! The 2 youngest girls were given sweet little doll houses that you could tell were going to be treasured for many years to come.
This year we found an equally unique and special gift to give to my beautiful mother-in-law. I shopped online at The Vintage Pearl and found the most perfect necklace for her. 
It is called the layered circle of love and was hand stamped with all 8 of her grand children's names.
Later on Christmas Eve, we enjoyed dinner at my parents' home. Soon after we gathered around their beautiful tree to open gifts.
The girls were delighted (which may be an understatement) to open their gifts and find new lalaloopsy dolls to add to their collection.

The girls and I had made special Christmas ornaments for everyone this year. It has become somewhat of a tradition for us actually. Last year we made snowman ornaments made from infant socks, and this year we made cinnamon cookie cut out ornaments along with feather filled clear glass ball ornaments. 
They turned out quite lovely I think.
We then had to hurry home so that we could set out snickerdoodles and milk for Santa and carrots for his reindeer and then it was off to bed. On our way home, we admired all of the beautiful Christmas light decorations.
Then 8 a.m. on the dot Christmas morning we were awakened by a very excited Xiera announcing that Santa had come! We rushed trudged sleepily into the living room to see what the jolly old elf had brought. 
I believe there were two little girls who made it to Santa's Nice List this year!
I hope everyone had a very Merry Christmas and has a wonderful and safe New Year's this weekend.
Friday, December 30, 2011
Christmas = Peace, Love, and Joy
Saturday, December 17, 2011
It's Beginning to Look A lot Like Christmas
Our tree is up...
And decorated with our favorite treasured ornaments.
The stockings are all hung and we have a new little friend who came to visit us from the North Pole. 
Her name is Holly and she is such a sweet yet mischievous little elf. She has been very busy popping up in different places in our home every morning. She is Santa's spy and she leaves us every night to tell Santa Claus if the girls were being naughty or nice.
The girls simply adore her as do I! :)
Last week Xiera and Zella took another art class making Christmas ornaments. They made many different kinds. They made puzzle piece wreathes, stamped Christmas cards, gingerbread people, and glitter ornament balls.
I am finishing up the last of my custom Christmas orders this evening and mailing them out in the morning. I am really cutting too close this year. Note to self: **Remember to switch your Etsy store to vacation mode right after black Friday to ensure all orders will get out in time for Christmas.** I have come to realize that people do not read the BOLD notice at the top of my store stating that I am no longer taking Christmas orders after December 2nd. I have pulled many late nighters because of this but even with the lack of sleep that I have had, I still have been very pleased with a few custom orders I have created.
One of my favorites was this custom stocking hat I made. It is reversed in color compared to my original Holly Jolly Elf hat and features a holly leaf and berries on the front cuff band with a red pom pom ball dangling from the end instead of a bell. 
It turned out VERY cute I think!
Sunday, November 27, 2011
Spending A Little Time With Santa
Christmas is once again rapidly approaching us. Of course our weather isn't exactly as expected; 65 degrees in Ohio at the end of November. Not that I am complaining in the least. It is really nice to not have to wear a bulky coat everywhere.
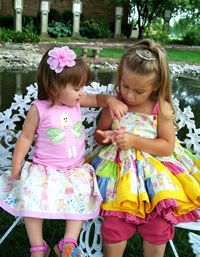
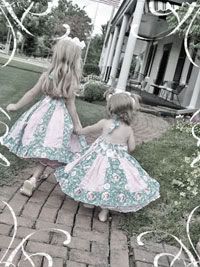
We kept with tradition and visited Santa Claus at the community center. The girls dressed in their beautiful gingerbread girl dresses for the occasion. Their adorable dresses were made by Mandy of Gooseberry Lane Originals. I am making a pair of leg warmers to match these dresses. I unfortunately did not have enough time to finish them before visiting Santa but plan to have them finished before the girls have their Christmas portraits done. Karen of Layla*and*Stitch made their long sleeved peasant shirts they are wearing underneath their dresses. So cute!
There is something almost magical when walking into the center and hearing the orchestra playing Christmas songs and seeing their gorgeous Christmas tree all lit up and decorated to perfection.
The girls' eyes widened with excitement and their smiles expanded from ear to ear!
They brought along their American Girl dolls this year and I wished I would have had dresses made to match for their dolls. I will have to make a mental blog note and do that next year. Build A Bear Clothes do work great for American Girl dolls though. That is what we did for Xiera's doll so she could have her doll dressed for the occasion.
Santa arrived on his sleigh on wheels and you could hear the squeals of excitement come from every child there. While waiting in line to get balloon art from the talented balloon lady, the girls snuck onto the sleigh to take it for a "pretend" spin.
Finally after a long wait in line while filling up on chocolate chip cookies and dancing to Christmas music, the girls were next to have their balloons made. Most children had crazy elf hats, candy canes, snowmen, and reindeer made. 
Xiera's request was so sweet that it made my heart smile. She had asked for a baby Jesus. I am so happy and proud that my girls remember the true meaning of Christmas. It isn't about the presents, the decorations, the lights, or Santa. It is about the birth of our Savior, Jesus Christ. The talented balloon lady didn't hesitate, and began whipping up a baby Jesus balloon for her.
and then she made another for Zella. :)
Soon after, the girls finally had their visit with the Jolly Old Elf himself, Mr. Claus. Xiera shared her list with him which included a few of her favorites that she would like to have this year; A Figit Friend named Willa, A Penbo Penguin, Laguna Blue Monster High Doll, and a few Lalaloopsy dolls; Rosy Bumps and Bruises, Suzette La Sweete, and Holly Sleighbells.
Then it was Zella's turn.
Zella didn't have a list but had only one special request; The Monster High Doll, Abbey Bominable. Santa reminded them to be good little girls and he would do his best to make their Christmas a happy one this year. :)
Monday, November 21, 2011
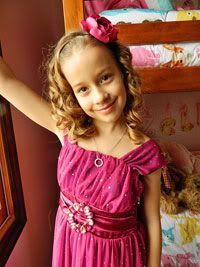
Last Minute Accessory...
Zella had picture day at Pre-Kindergarten today and I had her outfit all clean, pressed and ready to wear last night when I started thinking about what I was going to do with her hair. Should I put it up? Should I keep it down and curl it? Do I even have any cute hair accessories to match? After some thought, I decided I was going to part her hair in the middle and clip the front sides back, but I had a small dilemma....I needed clippies to match the pretty pink and blue plaid K.C. Parker skirt and sweater set I had planned for her to wear. I then looked through my yarn and got an idea for a cute and quick pair of flower hair clippies.
I think they complete the outfit, don't you? I am looking forward to seeing her adorable pictures and class picture with all of her little friends.
Friday, November 18, 2011
My Fingers and Hook have been busy....
I have been very busy this week with custom orders. My beloved customers have such great taste. The first hat I made was a floral cloche hat very similar to my Isn't She Lovely Cloche design except it was done in more vibrant and fun colors.
The next custom hat I made was for a very special little customer I hold dear to my heart...my lovely daughter Xiera of course. ;) She requested a Lalaloopsy crochet hat made with her favorite Lalaloopsy character, Pillow Featherbed. Remember her Halloween costume?
How could I tell those beautiful big brown eyes no? Xiera actually helped me with the design of this hat. I made the hat to resemble Pillow Featherbed's actual pajamas. I used raspberry and light pink and trimmed it with a whip stitch using orange and white. As I was designing Pillow's hair, Xiera told me that Pillow's hair needed to be twisted and then proceeded to show me how it had to be done. I have to admit, my vision was completely different than hers, but I adore the final result. Her twisting method was brilliant!!
My final custom, which I actually just finished this afternoon, turned out better than I could have ever imagined. My sweet friend Bekah had asked me to make a special owl hat for her adorable daughter Shelby. It needed to be bright, fun, fluffy, and wonderful....
I LOVE all of the textures this hat has to offer and the colors are so vibrant! This hat just screams, "FUN!" It is the softest hat too. I used Yarn Bee's Cameo Bulky in Pink Pearl mixed with I Love Cotton yarn in pink. 
I think the dramatic eyes with those eyelashes MAKE this hat. I know Zella loves it!
I plan on listing all three of these hats in my Etsy store early next week as customs so stay tuned.
Monday, November 14, 2011
First Free Pattern: The Very Hungry Caterpillar Hat

This past weekend I had a request for my Very Hungry Caterpillar Hat pattern. I have actually never written a pattern before and do most of my patterns from trial and error and recreate from memory and measurements. So I took on the challenge and wrote my very first pattern, so please bear with me if it is hard to follow, but I did try to be as thorough as possible.
The Very Hungry Caterpillar Crochet Hat Pattern
I use Sugar and Creme Cotton Yarn For this Hat and some scrap yarn for the the eyes.
Starting with your basic white color and using a g hook for small children sizes and an h hook for adult sizes, or hook needed for gauge. (infant hats will need a smaller gauge, or larger gauge for larger adult size.)
1. Ch 2, work 8 hdc in 2nd chain from hook;do not turn. Cap is worked in a round. You can place a marker on the last stitch of each row to keep track. (8sts)
2. Work 2 hdc in each st around. (16 sts)
3. (2 hdc in next st, 1 hdc in next) around. (24 sts)
4. (Hdc in next 2 sts, 2 hdc in next) around. (32 sts)
5. Repeat row 4, hdc in last 2 sts. (42 sts)
6-11. Hdc in each st around.
Changing to lighter grass green
12-14. Sc in each st around. Fasten off. Weave in all ends.
Depending on the size you can add extra rows or take a few out as you are working the rounds of the hat.
For the hungry caterpillar I made smaller circles in dark emerald green and grass green, and one larger red circle for the head. I made two tiny yellow circles for the eyes. I used a basic circle stitch for the caterpillar's body segments, head, and eyes.
Using a g hook or size needed for gauge. Starting with dark emerald green. Make 3.
1. ch 2, insert hook in first chain and sc 4 sts. (4 sts) Circles are worked in rounds, do not connect. You can place a marker on the last stitch of each row to keep track.
2. ch 1, work 2 sc in each st around. (8 sts) fasten off and weave in ends.
Using a g hook or size needed for gauge. Starting with lighter grass green. Make 2.
1. ch 2, insert hook in first chain and sc 4 sts. (4 sts) Circles are worked in rounds, do not connect. You can place a marker on the last stitch of each row to keep track.
2. ch 1, work 2 sc in each st around. (8 sts) fasten off and weave in ends.
Using a g hook or size needed for gauge. Starting with red.
1. ch 2, insert hook in first chain and sc 4 sts. (4 sts) Circle is worked in rounds, do not connect. You can place a marker on the last stitch of each row to keep track.
2. ch 1, work 2 sc in each st around. (8 sts)
3. ch 1, (sc in first st and 2 sc in next st) around (12 sts) fasten off and weave in ends.
Using an f hook or size needed for gauge. Starting with yellow. Make 2.
1. ch 2, insert hook in first chain and sc 4 sts. (4 sts) fasten off and weave in ends.
For the inner pupils of the eyes I use emerald green and embroider the eyes into place. I do a technique that is a bit different than what others may do. First cut a 24 inch piece of emerald green sugar and creme yarn and split the yarn fibers of 4 in half so you have two strands of thickness to work with. Thread this through the eye of a yarn needle and fasten it underneath one of the yellow eye circles with a small knot. Then come up the middle of the yellow circle with needle and pull the yarn all the way up and then make a knot close to the circle. Do this knot twice to make it large. (So make a second knot around the first.) Then wrap the yarn around and around the knot 2 or 3 times to get the size of circle you want. Then once you have your desired size of the eye pupil, insert the needle back down a side of the green pupil into the yellow circle. Then come back up near the middle knot with the needle and go back down near the middle edge of the pupil. Do this about 3 to 4 times until the pupil is securely fastened down into the center of the yellow circle. You will do this particular stitch 3 times. Twice for the pupils of the eyes on the 2 yellow circles, and once for the mouth of the caterpillar on red circle. Fasten off and weave in all of your ends.
Sew your eyes onto the red circle head of the caterpillar. After this step I make the mouth of the caterpillar using the above technique used for the pupil of the eyes.
Using the other 2 emerald green strands leftover from when we split the fibers for the making of the eye pupils and using an f gauged hook, insert the yarn into the top side of the caterpillar's red circled head and chain 3. Fasten off and leave a little bit of yarn left out to make the antenna. Do this again for the caterpillar's other antenna on the other side of the top of the head.
Now it is time to sew!
Position all of the circles the way you want along the bottom center of the hat right above the grass green edging. Starting with the emerald green circle first positioned to the farthest left and then the grass green next and so on and so forth. Sew the red caterpillar head on last leaving the antennas not sewn on so it has a 3d effect. You can sew the circles straight across or in an up and down pattern as I have done to make the caterpillar look like he is walking along.
So there it is! I hope you have a lot of fun and if you have any questions at all regarding this pattern please feel free to email or message me. Thanks and happy crocheting!
Saturday, November 12, 2011
Exploring Our Senses of Sight and Touch...
The girls enjoyed themselves this morning while attending their art class at the Troy Hayner Cultural Center. The class focused on different painting techniques besides the normal paint brush. The first project they created were pussy willow trees.
They dipped textured strings of yarn into paint and then pressed them onto paper. They then used their fingers starting with their larger fingers, (thumbs) along the bottom of the pussy willow tree first. Then working their way up the tree they used their index fingers and so on and so forth until they reached the top branches which required their pinkies to make the tiny pussy willow blossoms.
Their next project was painting landscape compositions. They picked out their favorite landscape picture and then painted what they saw. This time they were able to use paint brushes and fingers. They also learned about color mixing to create different shades of colors.
Xiera found a new technique to create texture to her painting by turning the brush upside down and using it to add detail. She used this technique to create bricks and grass strokes.
Zella preferred using only the paint brush for this project and used many different sized brushes to create her vision.
It is really amazing to see what they create. A child's vision is truly a beautiful thing. They are looking forward to the next upcoming art class where they will be creating handmade Christmas ornaments. It sounds like lots of fun and what is even more exciting is that mommy doesn't have to clean up the mess. ;)
Thursday, November 10, 2011
Run! Run! As Fast As You Can...
You Can't Catch Me, I'm The Gingerbread Man,is the name of this adorable treasury created by Nikki of Darcysdolls.
I can't help but to smile when I look at all of those sweet gingerbread faces. And I am so honored that she chose my candy gingerbread man hat to be apart of all the fun. ;) You can also view the original treasury HERE.
Friday, November 4, 2011
You're a Mean One, Mr. Grinch
I had a request for a custom Mr. Grinch purse to match one of my little customer's outfits. I knew this was going to be a lot of fun to create. The Grinch is such a mischievous and fun character. So here he is!
I think he turned out adorable even for being "The Mean One." I like how it turned out so much, that I listed a custom Grinch purse in my store. You can find it HERE.
Tuesday, November 1, 2011
Happy Lala Ween!
Can you guess what the girls were for Halloween this year?
If you guessed Lalaloopsy dolls, then kiss your brain and give yourself a pat on the back. ;) Xiera was Pillow Featherbed mainly because she wanted to be "warm and cozy" while trick or treating this year. Her favorite lalaloopsy is Spot Splatter Splash. Zella dressed as Marina Anchors, her absolute favorite! Xiera's costume with wig was purchased online at buycostumes.com. Zella's costume was custom made by Karen of Layla*and*Stitch. I made the wig to match. Making that wig was quite the task and I hope never to make another again, (I am terrible with a sewing machine believe it or not!) but it did turn out adorable and went perfect with her costume.
Karen also made their pet candy bags to match their costume character's pets. Aren't they the cutest? 
We carved pumpkins the night before Halloween. Xiera helped with taking all of the pumpkin pulp and seeds out while daddy and I carved. Zella was in charge of supervising. She was not a fan of the cold and slimy seeds and pulp. This year daddy carved a whole kitty instead of a kitty face like the one I carved last year, and I carved Jack's face from A Nightmare Before Christmas into the other.

This year was blissfully sad for me because it was the first year that the girls went trick or treating without mommy or daddy accompanying them up to the doors. Daddy and I watched at the end of each driveway as they walked up together to each door and we both wondered where did the time go? Our little girls are growing up right before our very eyes and are so independent now.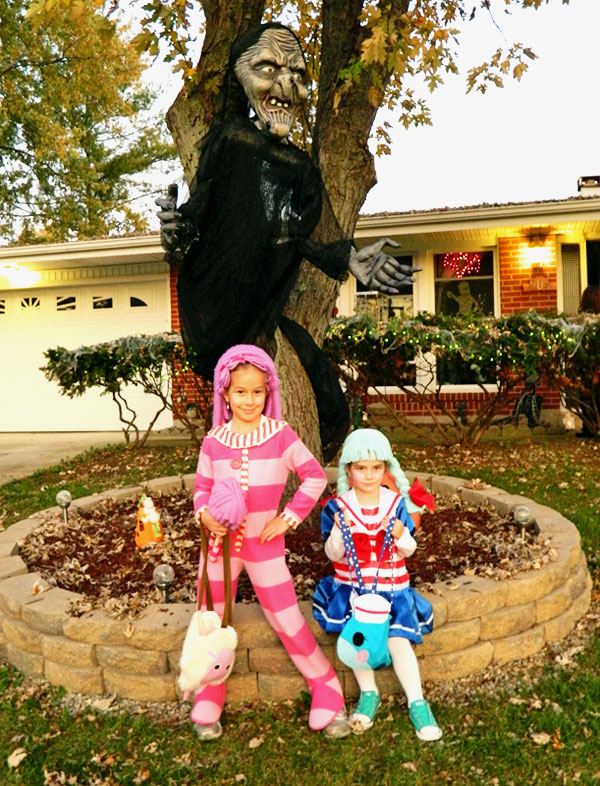
We all had such a great time last night and the girls received all treats and no tricks!


.JPG)


